Integration Guide
This Integration Guide will help you fully integrate 1-Click Signup into your application.
| Time to Integrate | 1 hour |
|---|---|
| Time to Test and Deploy | 1 day |
| Steps Required | Make API call(s), send SMS |
Setup
1. Log into Dashboard.
Access the Verified Dashboard.
a. Enter your email and click the 1-Click Login button.
We'll send you a verification code by email.
Use your work email. We use AI magic to autofill brand information based on your email domain, so you don't have to manually enter it!
b. Complete the verification step.
Click the verification button in the email or enter the verification code. We'll automatically log you in. It's a 1-click experience, as promised!
c. (if necessary) Confirm your company name.
If you're creating the Dashboard account for your company, we'll ask you to confirm your company name. If someone on your team has already created your account, you won't need to do this.
If your account doesn't have a brand yet, we'll automatically create one for you and take you to its Brand Details page.
Your company account can have one or more brands. Generally, you'll only need one brand, but there are some cases where it's helpful to use multiple. For example:
- If you have multiple products: If you have products that go by different names, it can be useful to create different brands to help users know which product they're using 1-Click Signup for — and to help your team track metrics specific to that product.
- If you want to try different brand settings: If you want to change brand settings without affecting your existing implementation (even in Sandbox), you can duplicate your brand and configure different settings on the new brand.
2. Determine integration type.
On the Brand Details page in the Dashboard, you can configure settings for your brand.
The most important brand setting is integration type, which affects how you implement 1-Click Signup.
You can always start with one integration type and change it later.
There are three options for integration type:
| Integration Type | User Interface | Phone Verification | Description | Best If... |
|---|---|---|---|---|
| Hosted | Hosted by Verified | Hosted by Verified | Use Verified's UI and Verified's verification code | You want the quickest implementation |
| Semi-Hosted | Hosted by You | Hosted by Verified | Use your own UI but Verified's verification code | You don't already verify users' phone numbers |
| Non-Hosted Recommended | Hosted by You | Hosted by You | Use your own UI and your own verification code | You do already verify users' phone numbers |
Non-Hosted is the most common integration type and the one we recommend. It allows you to make 1 API call and receive user data directly in the response body. It's the simplest way to integrate 1-Click Signup, as long as you already verify user's phone numbers. If you don't already do this, Semi-Hosted or Hosted may be a better option.
Determining which option is best for you is simple. Just answer these questions:
a. Do you want to use Verified's UI or your own?
Using Verified's UI is the easiest option, but using your own UI is more white label. You can always start with Verified's UI — for example to quickly try out 1-Click Signup — and then switch to your own UI later.
- Verified's UI → Select Hosted and go to Integration
- Your own UI → Continue to question 2...
b. Do you want to use Verified's phone verification or your own?
If you don't already verify users' phone numbers, it's easiest to use Verified's phone verification. But if you already verify users' phone numbers and want to use your existing solution for that, you can use your own phone verification.
- Verified's phone verification → Select Semi-Hosted and go to Integration
- Your own phone verification → Select Non-Hosted and go to Integration
Integration
Please do all development work and testing against our Sandbox environment, which returns mock data. You can use our Production environment when you're ready to go live.
- Hosted
- Semi-Hosted
- Non-Hosted
With the Hosted tab active above, your brand's integration type setting should be set to Hosted in the Dashboard. See Determine integration type if you need help deciding which type is right for you.
1. Prompt user for phone number.
To start 1-Click Signup for a user (using the Hosted integration type), you'll need their phone number.
We recommend using a form with a phone number input that automatically submits when the user enters 10 digits. See our Demo for an example of this.
Currently, we only support US mobile phone numbers. You'll need to pass these to our API in E.164 format. This is the +1 country code with a 10-digit subscriber code appended to it, for example +10123456789.
We're able to source verified data for about 95% of these phone numbers. If we can't source data, you can take the user through your normal signup flow.
You'll also need to:
Here's a full example:
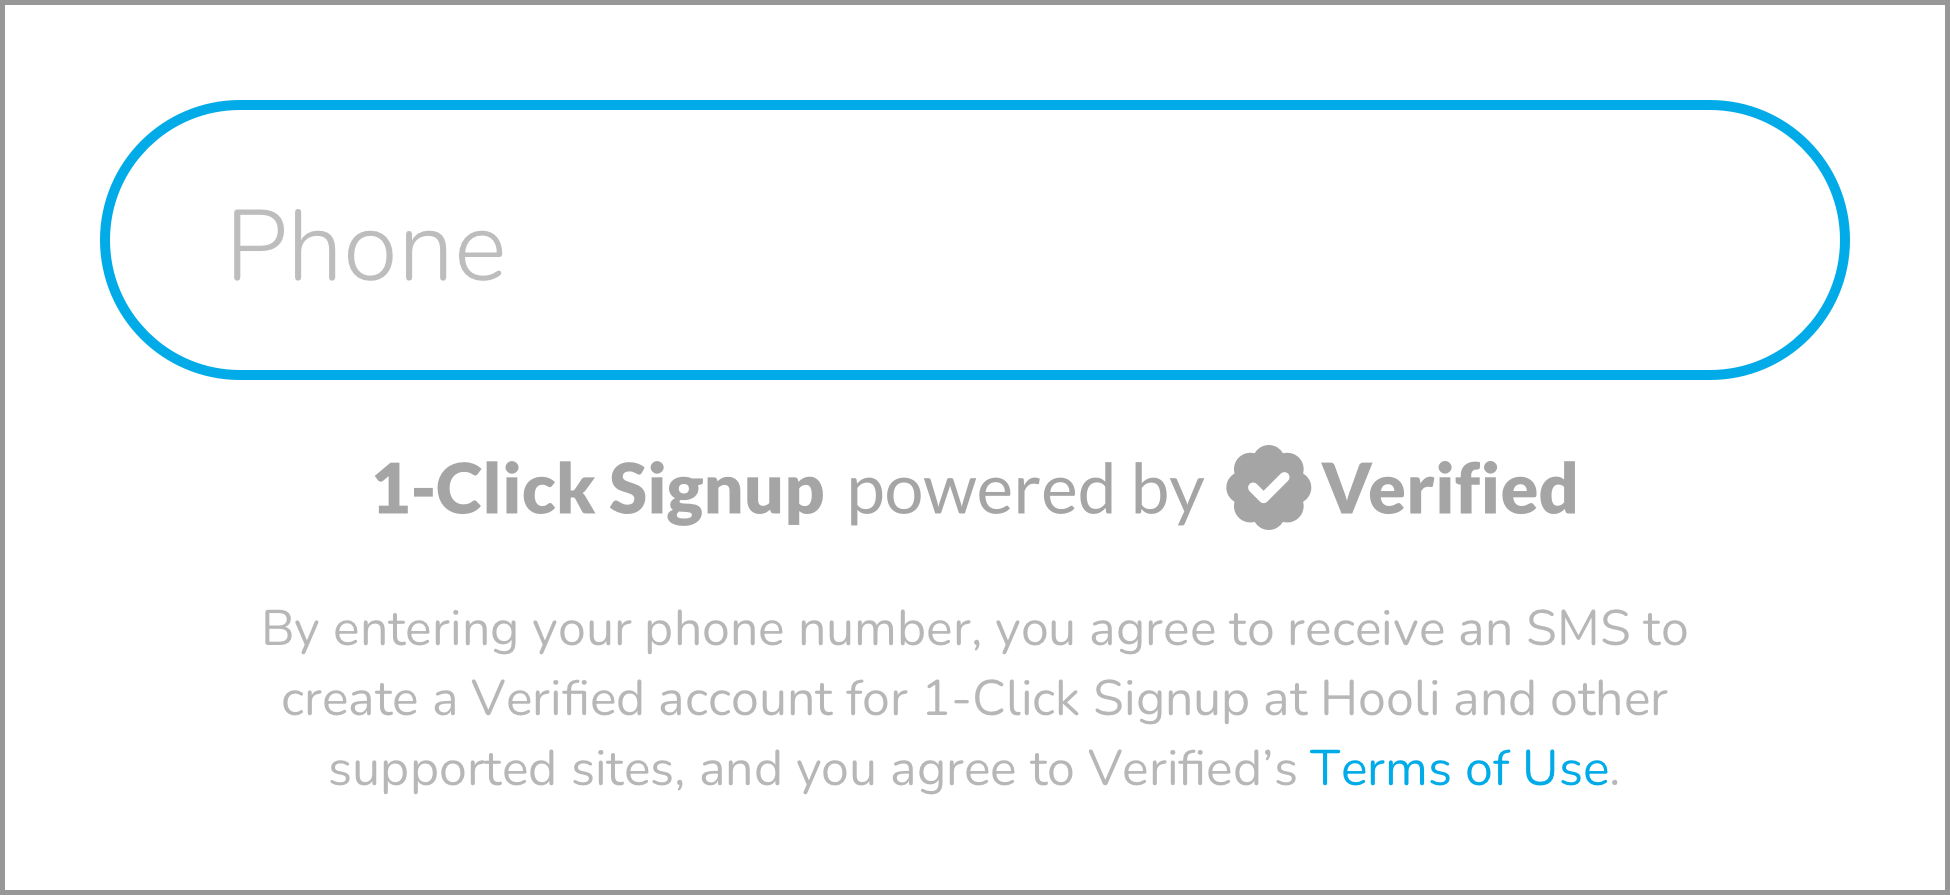 Hooli uses a phone number input, and they include a gray variant of the "powered by" graphic and Verified legal language.
a. Include "powered by Verified" graphic.
We require you to include a graphic that says "1-Click Signup powered by Verified". This helps the user understand they're about to go through a 1-Click Signup flow — and motivates them to do so, since a 1-click experience is always best!
The graphic should be placed just below the trigger you use to start the 1-Click Signup flow. Usually, this is a phone number or birth date input or a button.
We provide several variants of the graphic, in both SVG and PNG format. Choose the one you prefer and that best fits the background color of your application.
"Powered By Verified" Graphics
Green:

Black:

Gray:

White:

b. Include Verified legal language.
Regulations require that users give informed consent, so you must our legal language where you start the 1-Click Signup flow. It can be included alongside or as part of other legal language you already use, but it must be displayed to the user and not just included in terms you link out to.
Use this language:
By
{taking this action}, you agree to receive an SMS to create a Verified account for 1-Click Signup at{Brand Name}and other supported sites, and you agree to Verified's Terms of Use.
- Replace
{taking this action}with the action the user will take to start 1-Click Signup. For example:- If you use a form with a phone number input that autosubmits, we recommend using "entering your phone number".
- If you use a Continue button, we recommend using "clicking Continue".
- Replace
{Brand Name}with your brand name. - Link "Terms of Use" to https://verified.inc/legal#terms-of-use and make it a different color than the rest of the text, underlined, or both (so the user knows it's a link).
2. Call POST /1-click.
Call POST /1-click with the user's phone number.
The response body will contain url and code, which you'll use in the following steps.
3. Send SMS to user.
Send an SMS to the user with code from the response body of POST /1-click.
We recommend using this language, where {Brand Name} is your brand name:
Enter this code to verify for
{Brand Name}:code
For example:
Enter this code to verify for Hooli: 123456
You can also optionally use code to construct a verification link. For example, if url is a link to your application, you could:
- Append
codeas a URL parameter tourl:{url}?code={code}. - Set up your application to parse
codefrom the URL.
Then, you could include language like this in the SMS:
Click this link to verify for
{Brand Name}:{url}?code={code}
For example, if the url for the Hooli brand is https://hooli.com/verified:
Click this link to verify for Hooli: https://hooli.com/verified?code=123456
Our test user's phone numbers aren't valid phone numbers, so sending SMS to them won't work. You can simulate the SMS step by using the static verification code (111111), but we recommend instead using your own phone number(s) for testing, so you can send yourself real SMS messages.
4. Redirect user.
Redirect the user to url from the response body of POST /1-click. (If the user is in your mobile app, open a webview to url.)
This url is a link to our web app, where we'll prompt the user to:
- Enter their verification code
- (if necessary) Enter their birth date
- Confirm their data and agree to share it with your brand
When the user has completed this, we'll redirect them back to you.
5. Parse identityUuid from URL.
When we redirect the user back to you, we'll include on the redirect URL an identityUuid URL parameter, whose value is a UUID.
For example, if your redirect URL is https://hooli.com/verified, we will send the user to:
https://hooli.com/verified?identityUuid=47e34f9c-a18b-4e67-a202-3f5389d06c08
We'll redirect the user to the default redirect URL set for your brand in the Dashboard, unless you overrode that default by including redirectUrl in the request body of POST /1-click.
Parse the value of the identityUuid URL parameter from the redirect URL. You'll use this UUID in the next step. (If the user is in your mobile app, you can now close the webview you opened in the previous step.)
6. Call GET /1-click.
Call GET /1-click/{identityUuid} with the value of the identityUuid URL parameter.
The response body will be a 1ClickEntity (see this example), which contains the user's data and metadata about it. You can use this data however you like to create a new account for the user!
With the Semi-Hosted tab active above, your brand's integration type setting should be set to Semi-Hosted in the Dashboard. See Determine integration type if you need help deciding which type is right for you.
1. Prompt user for phone number and birth date.
To start 1-Click Signup for a user (using the Semi-Hosted integration type), you'll need their phone number and birth date. (We require a birth date to ensure we retrieve data for only the correct user.)
We recommend using a form with:
- For the phone number, a phone number input that automatically continues when the user enters 10 digits.
- For the birth date, a numeric input (formatted as
MM/DD/YYYYor similar) that automatically continues when the user enters 8 digits.
We recommend automatically submitting the form when both inputs have valid values. See our Demo for an example of this.
Currently, we only support US mobile phone numbers. You'll need to pass these to our API in E.164 format. This is the +1 country code with a 10-digit subscriber code appended to it, for example +10123456789.
We're able to source verified data for about 95% of these phone numbers. If we can't source data, you can take the user through your normal signup flow.
You'll need to pass the birth date to our API (in the request body of POST /1-click) in YYYY-MM-DD format, but you should collect it from the user in whatever form you think results in the best user experience for your use case.
You'll also need to:
Here's a full example:
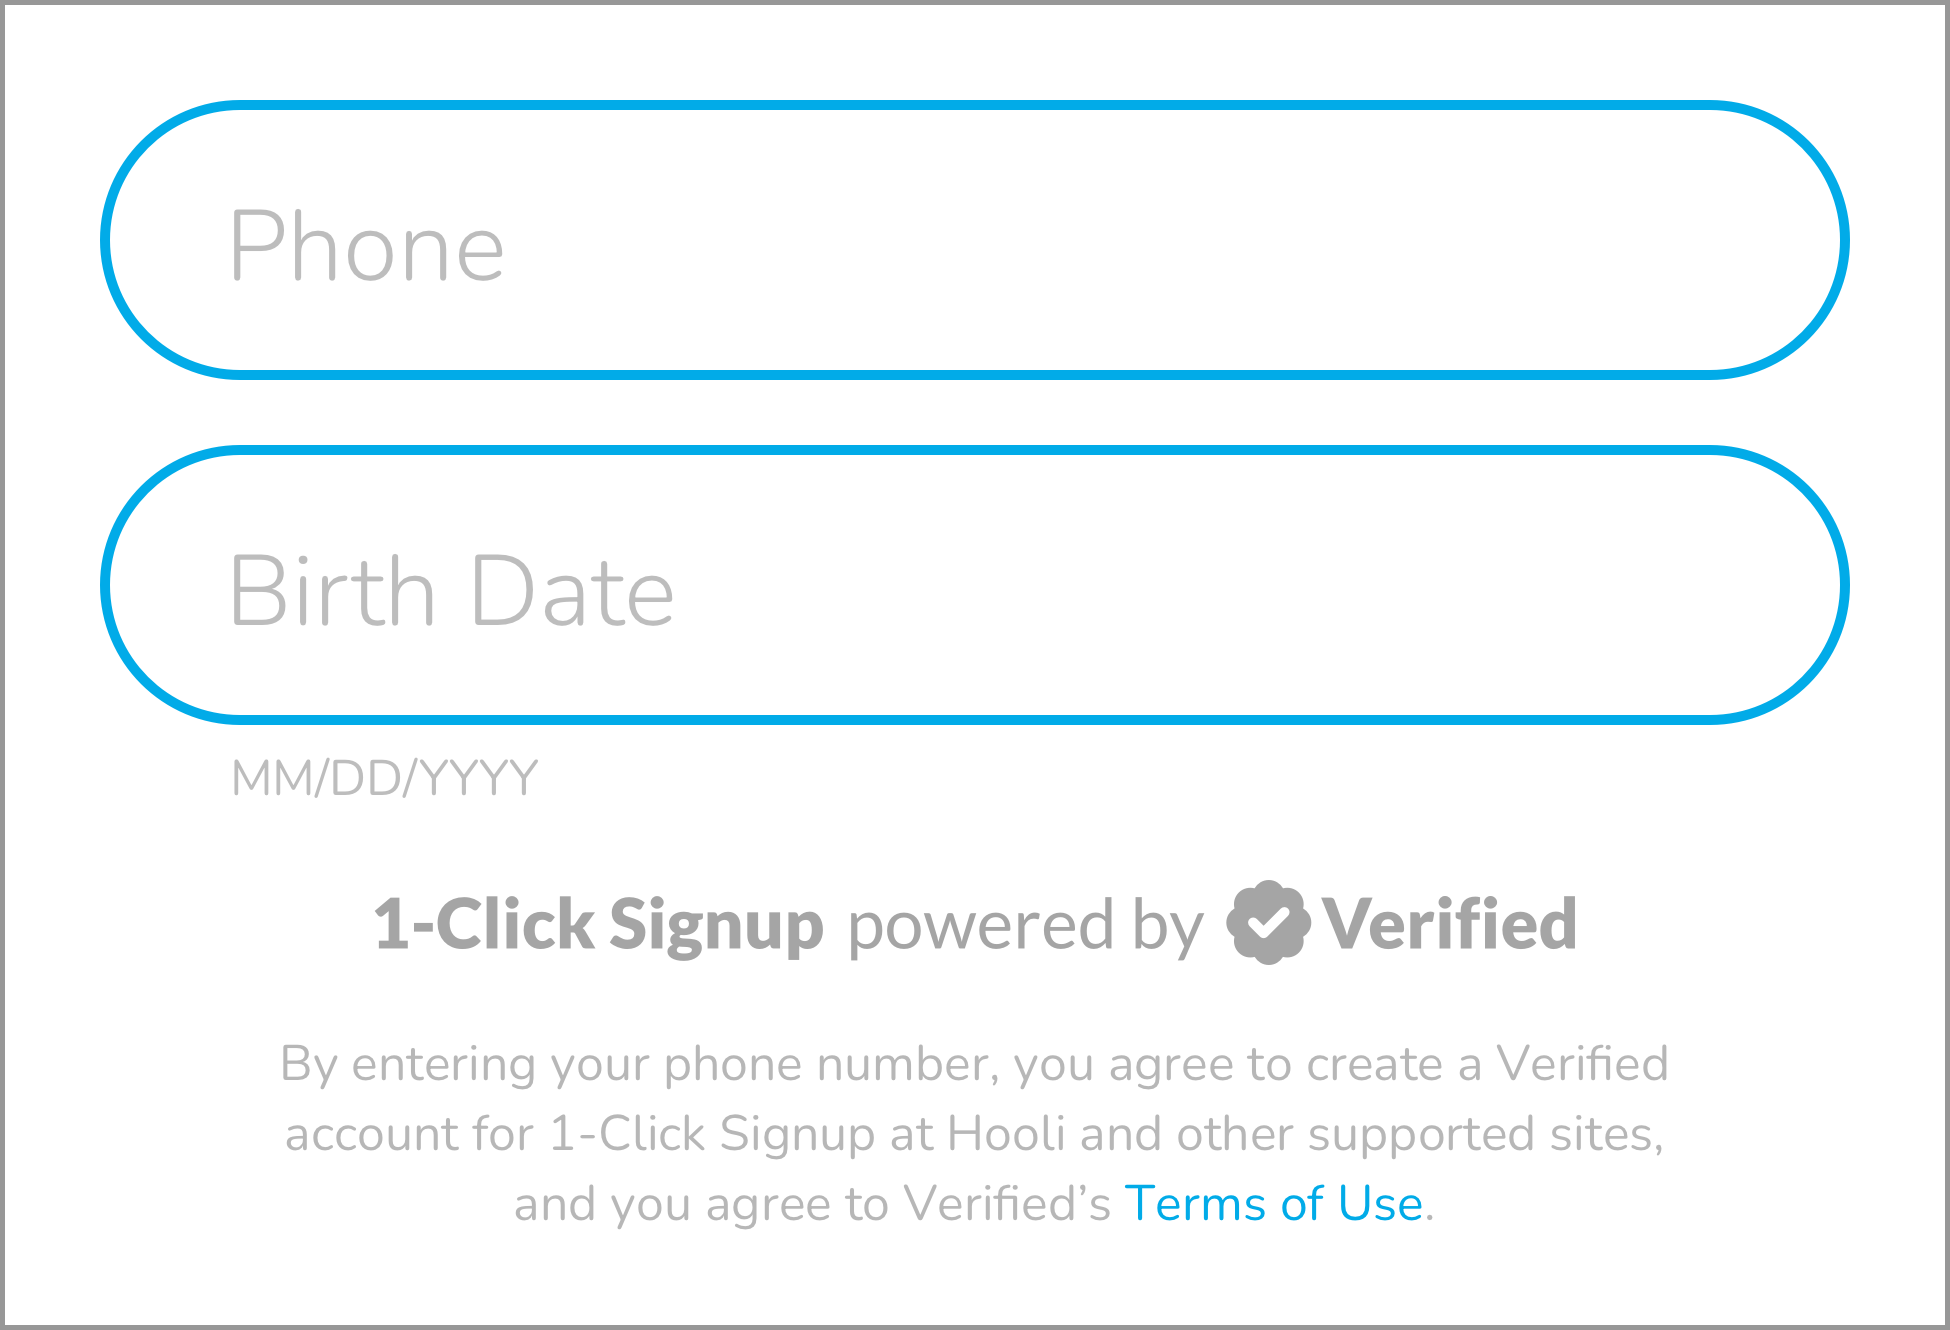 Hooli uses phone number and birth date inputs, and they include a gray variant of the "powered by" graphic and Verified legal language.
a. Include "powered by Verified" graphic.
We require you to include a graphic that says "1-Click Signup powered by Verified". This helps the user understand they're about to go through a 1-Click Signup flow — and motivates them to do so, since a 1-click experience is always best!
The graphic should be placed just below the trigger you use to start the 1-Click Signup flow. Usually, this is a phone number or birth date input or a button.
We provide several variants of the graphic, in both SVG and PNG format. Choose the one you prefer and that best fits the background color of your application.
"Powered By Verified" Graphics
Green:
Black:
Gray:
White:
b. Include Verified legal language.
Regulations require that users give informed consent, so you must our legal language where you start the 1-Click Signup flow. It can be included alongside or as part of other legal language you already use, but it must be displayed to the user and not just included in terms you link out to.
Use this language:
By
{taking this action}, you agree to create a Verified account for 1-Click Signup at{Brand Name}and other supported sites, and you agree to Verified's Terms of Use.
- Replace
{taking this action}with the action the user will take to start 1-Click Signup. For example:- If you use a form with a phone number input that autosubmits, we recommend using "entering your phone number".
- If you use a Continue button, we recommend using "clicking Continue".
- Replace
{Brand Name}with your brand name. - Link "Terms of Use" to https://verified.inc/legal#terms-of-use and make it a different color than the rest of the text, underlined, or both (so the user knows it's a link).
2. Call POST /1-click.
Call POST /1-click with the user's phone number and birth date.
The response body will contain uuid and code, which you'll use in the following steps.
3. Send SMS to user.
Send an SMS to the user with code from the response body of POST /1-click.
We recommend using this language, where {Brand Name} is your brand name:
Enter this code to verify for
{Brand Name}:code
For example:
Enter this code to verify for Hooli: 123456
You can also optionally use code to construct a verification link. For example, if url is a link to your application, you could:
- Append
codeas a URL parameter tourl:{url}?code={code}. - Set up your application to parse
codefrom the URL.
Then, you could include language like this in the SMS:
Click this link to verify for
{Brand Name}:{url}?code={code}
For example, if the url for the Hooli brand is https://hooli.com/verified:
Click this link to verify for Hooli: https://hooli.com/verified?code=123456
Our test user's phone numbers aren't valid phone numbers, so sending SMS to them won't work. You can simulate the SMS step by using the static verification code (111111), but we recommend instead using your own phone number(s) for testing, so you can send yourself real SMS messages.
4. Prompt user for verification code.
We recommend using a form with a numeric input that automatically submits when the user enters 6 digits (because code has 6 digits).
Let's call what the user inputs userInput. You'll use this in the next step.
5. Call GET /1-click.
Call GET /1-click/{uuid}?{userInput} with uuid from the response body of POST /1-click and userInput.
Do NOT use code from the response body of POST /1-click as the value for userInput! You must use what the user inputted, so that only the user who controls the phone number can retrieve their verified data. If they enter the correct verification code, of course, it will match the value of code.
The response body will be a 1ClickEntity (see this example), which contains the user's data and metadata about it. You can use this data however you like to create a new account for the user!
6. Prompt user to confirm their data.
Depending on your use case, you may need to display the user's data to them and have them confirm it's correct.
In general, we recommend you have the user confirm their data for two reasons:
- Transparency: By displaying the user's data to them, you ensure they're aware of what data you've received about them.
- Accuracy: Although Verified provides very high quality data, we can never guarantee all data will be perfectly accurate. By having the user confirm their data, you can better avoid inaccuracies. Depending on your use case, you may want to give the user the ability to edit their data.
However, for some use cases, it may be appropriate and make more sense to not display the user's data to them or have them confirm it. Choose the approach that's best for your use case, but make sure it's compliant with regulations.
If you're subject to financial data regulations — for example, if you're opening a financial account for a user with the data we return about them — you are required to have the user confirm their data.
We recommend that you:
a. Use a form with autofilled inputs
We recommend that you display the user's data using a form with autofilled inputs. You only need to display the user's credential data (their identity data, like their address or birth date). You don't need to display any metadata, though you can choose to if it's relevant.
You can enable or disable each input depending on whether you want the user to be able to edit the data it contains. The upside of allowing the user to edit data is that it allows them to correct any inaccuracies. The downside is that user input isn't verified and may make fraud more likely.
We require you to mask Social Security Numbers because they're particularly sensitive:
- Mask the first 5 digits to ensure the full number stays private.
- If you allow the user to edit the number, clear the entire value (so they don't just edit the last 4 digits).
b. Include information about where the data comes from
Including some information about where the data comes from helps users understand the magic of 1-Click Signup and feel comfortable with it. We recommend this language:
We use Verified to autofill your data from trusted sources, so you don't have to enter it manually.
You can include this information in a variety of ways, for example as a tooltip on a "Where This Data Comes From" button.
The most common inaccuracy is an outdated address. We keep user addresses up to date as much as possible, but if the user has moved very recently, we may not yet have their current address.
Less commonly, a user may have an outdated name, if they've recently had it legally changed and we haven't yet updated it.
Some data points, like date of birth and SSN, should never change, but it's still possible (in very rare cases) for these to be inaccurate. So, if having perfectly accurate data is crucial for your use case, we recommend that you have users confirm it.
With the Non-Hosted tab active above, your brand's integration type setting should be set to Non-Hosted in the Dashboard. See Determine integration type if you need help deciding which type is right for you.
To start 1-Click Signup for a user (using the Non-Hosted integration type), you'll need their phone number and birth date, and you'll need to verify their phone number using your own solution.
The Non-Hosted integration type requires you to verify phone numbers with your own solution. If you'd like to use ours, switch to the Semi-Hosted or Hosted integration type.
1. Prompt user for phone number and verify it.
You can do this however you like, as long as you verify the user's phone number with a one-time verification code at least 6 digits long.
Currently, we only support US mobile phone numbers. You'll need to pass these to our API in E.164 format. This is the +1 country code with a 10-digit subscriber code appended to it, for example +10123456789.
We're able to source verified data for about 95% of these phone numbers. If we can't source data, you can take the user through your normal signup flow.
2. Prompt user for birth date.
We require a birth date to ensure we retrieve data for only the correct user.
We recommend using a form with a numeric input (formatted as MM/DD/YYYY or similar) that automatically submits when the user enters 8 digits. See our Demo for an example of this.
You'll need to pass the birth date to our API (in the request body of POST /1-click) in YYYY-MM-DD format, but you should collect it from the user in whatever form you think results in the best user experience for your use case.
You'll also need to:
Here's a full example:
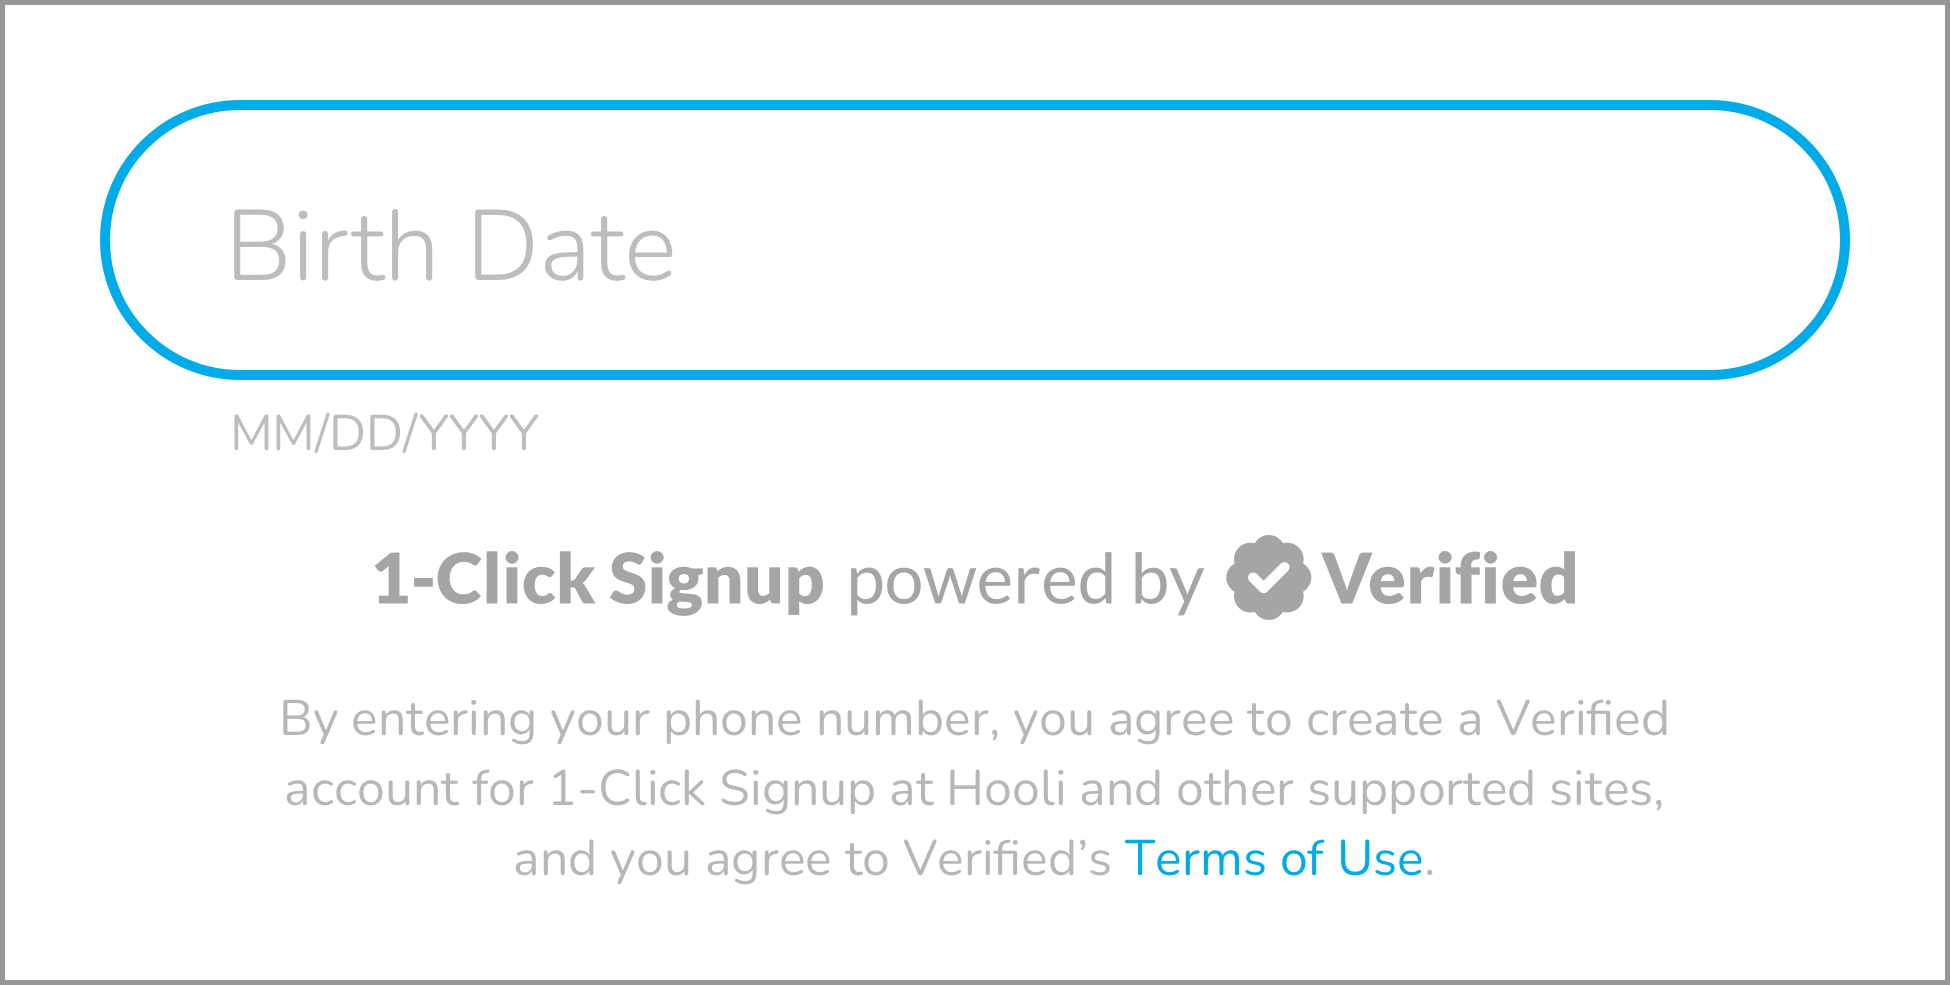 Hooli uses a birth date input, and they include a gray variant of the "powered by" graphic and Verified legal language.
a. Include "powered by Verified" graphic.
We require you to include a graphic that says "1-Click Signup powered by Verified". This helps the user understand they're about to go through a 1-Click Signup flow — and motivates them to do so, since a 1-click experience is always best!
The graphic should be placed just below the trigger you use to start the 1-Click Signup flow. Usually, this is a phone number or birth date input or a button.
We provide several variants of the graphic, in both SVG and PNG format. Choose the one you prefer and that best fits the background color of your application.
"Powered By Verified" Graphics
Green:
Black:
Gray:
White:
b. Include Verified legal language.
Regulations require that users give informed consent, so you must our legal language where you start the 1-Click Signup flow. It can be included alongside or as part of other legal language you already use, but it must be displayed to the user and not just included in terms you link out to.
Use this language:
By
{taking this action}, you agree to create a Verified account for 1-Click Signup at{Brand Name}and other supported sites, and you agree to Verified's Terms of Use.
- Replace
{taking this action}with the action the user will take to start 1-Click Signup. For example:- If you use a form with a phone number input that autosubmits, we recommend using "entering your phone number".
- If you use a Continue button, we recommend using "clicking Continue".
- Replace
{Brand Name}with your brand name. - Link "Terms of Use" to https://verified.inc/legal#terms-of-use and make it a different color than the rest of the text, underlined, or both (so the user knows it's a link).
3. Call POST /1-click.
Call POST /1-click with the user's phone number and birth date.
You must call POST /1-click within 30 minutes of verifying the user's phone number (step 1). This is an important anti-fraud measure.
The response body will contain a 1ClickEntity (see this example), keyed on identity, that contains the user's data and metadata about it. You can use this data however you like to create a new account for the user!
4. Prompt user to confirm their data.
Depending on your use case, you may need to display the user's data to them and have them confirm it's correct.
In general, we recommend you have the user confirm their data for two reasons:
- Transparency: By displaying the user's data to them, you ensure they're aware of what data you've received about them.
- Accuracy: Although Verified provides very high quality data, we can never guarantee all data will be perfectly accurate. By having the user confirm their data, you can better avoid inaccuracies. Depending on your use case, you may want to give the user the ability to edit their data.
However, for some use cases, it may be appropriate and make more sense to not display the user's data to them or have them confirm it. Choose the approach that's best for your use case, but make sure it's compliant with regulations.
If you're subject to financial data regulations — for example, if you're opening a financial account for a user with the data we return about them — you are required to have the user confirm their data.
We recommend that you:
a. Use a form with autofilled inputs
We recommend that you display the user's data using a form with autofilled inputs. You only need to display the user's credential data (their identity data, like their address or birth date). You don't need to display any metadata, though you can choose to if it's relevant.
You can enable or disable each input depending on whether you want the user to be able to edit the data it contains. The upside of allowing the user to edit data is that it allows them to correct any inaccuracies. The downside is that user input isn't verified and may make fraud more likely.
We require you to mask Social Security Numbers because they're particularly sensitive:
- Mask the first 5 digits to ensure the full number stays private.
- If you allow the user to edit the number, clear the entire value (so they don't just edit the last 4 digits).
b. Include information about where the data comes from
Including some information about where the data comes from helps users understand the magic of 1-Click Signup and feel comfortable with it. We recommend this language:
We use Verified to autofill your data from trusted sources, so you don't have to enter it manually.
You can include this information in a variety of ways, for example as a tooltip on a "Where This Data Comes From" button.
The most common inaccuracy is an outdated address. We keep user addresses up to date as much as possible, but if the user has moved very recently, we may not yet have their current address.
Less commonly, a user may have an outdated name, if they've recently had it legally changed and we haven't yet updated it.
Some data points, like date of birth and SSN, should never change, but it's still possible (in very rare cases) for these to be inaccurate. So, if having perfectly accurate data is crucial for your use case, we recommend that you have users confirm it.
Go Live!
When you're ready to go live, we will review your integration to see that:
Once we've confirmed these items, we'll approve your integration for Production, which will enable you to create Production API keys in the Dashboard.
Just swap your Sandbox API key for a Production API key, and you'll be live with 1-Click Signup!