API Integration
| Time to Complete | 1-2 days |
|---|---|
| Time to Test and Deploy | 1-1.5 weeks |
| Skills Required | Make API calls, build UX |
Complete the 1-Click Health Setup guide before following this API Integration guide.
Please do all development work and testing against our Sandbox environment, which returns mock data. You can use our Production environment when you're ready to go live.
To onboard a user for healthcare, you typically need to do the following:
- Collect the user's PII (Name, Birthday, Address, Sex, etc.).
- Collect the user's health insurance (Payer and Member ID).
- Run an eligibility check for the user's health insurance (to see what the insurance covers).
1-Click Signup solves (1) by letting you autofill the user's PII, and 1-Click Health solves (2) and (3) by letting you autofill the user's health insurance and run an eligibility check for that insurance.
1-Click Health has two core capabilities:
- Insurance Autofill: Autofill a user's insurance information.
- Eligibility Check: Run an eligibility check for a user's insurance.
We often refer to these simply as autofill and check:
| Capability | Description | Inputs | Outputs |
|---|---|---|---|
| Autofill | Autofill a user's insurance information |
|
|
| Check | Run an eligibility check for a user's insurance |
|
|
| Autofill + Check | Autofill a user's insurance information and automatically run an eligibility check for it |
|
|
You can use autofill with or without specifying a payer (or payer group). Specifying a payer can be helpful if, for example, you want to autofill insurance just from Medicare or "the Blues" (Blue Cross Blue Shield affiliated payers), for which we have specific payer groups.
You can use either or both of autofill and check with a single API call: see step 2 for details. They're automatically combined if the Check After Autofill setting is set to On in the Dashboard or if the checkAfterAutofill field in the request body of POST /1-click/health is set to true.
1. Collect inputs.
To start 1-Click Health for a user, you'll need to collect input user data: see 1-Click Health Inputs for details.
Only First Name, Last Name, and Birth Date are required, but the more inputs you provide, the higher coverage and accuracy will be. Because 1-Click Health is billed per attempt (not just per success), it's well worth collecting more inputs upfront.
We strongly recommend using 1-Click Signup to collect these inputs! With 1-Click Signup, you can collect all of these inputs in less than 10 seconds, from as little as a user's phone number.
You'll also need to:
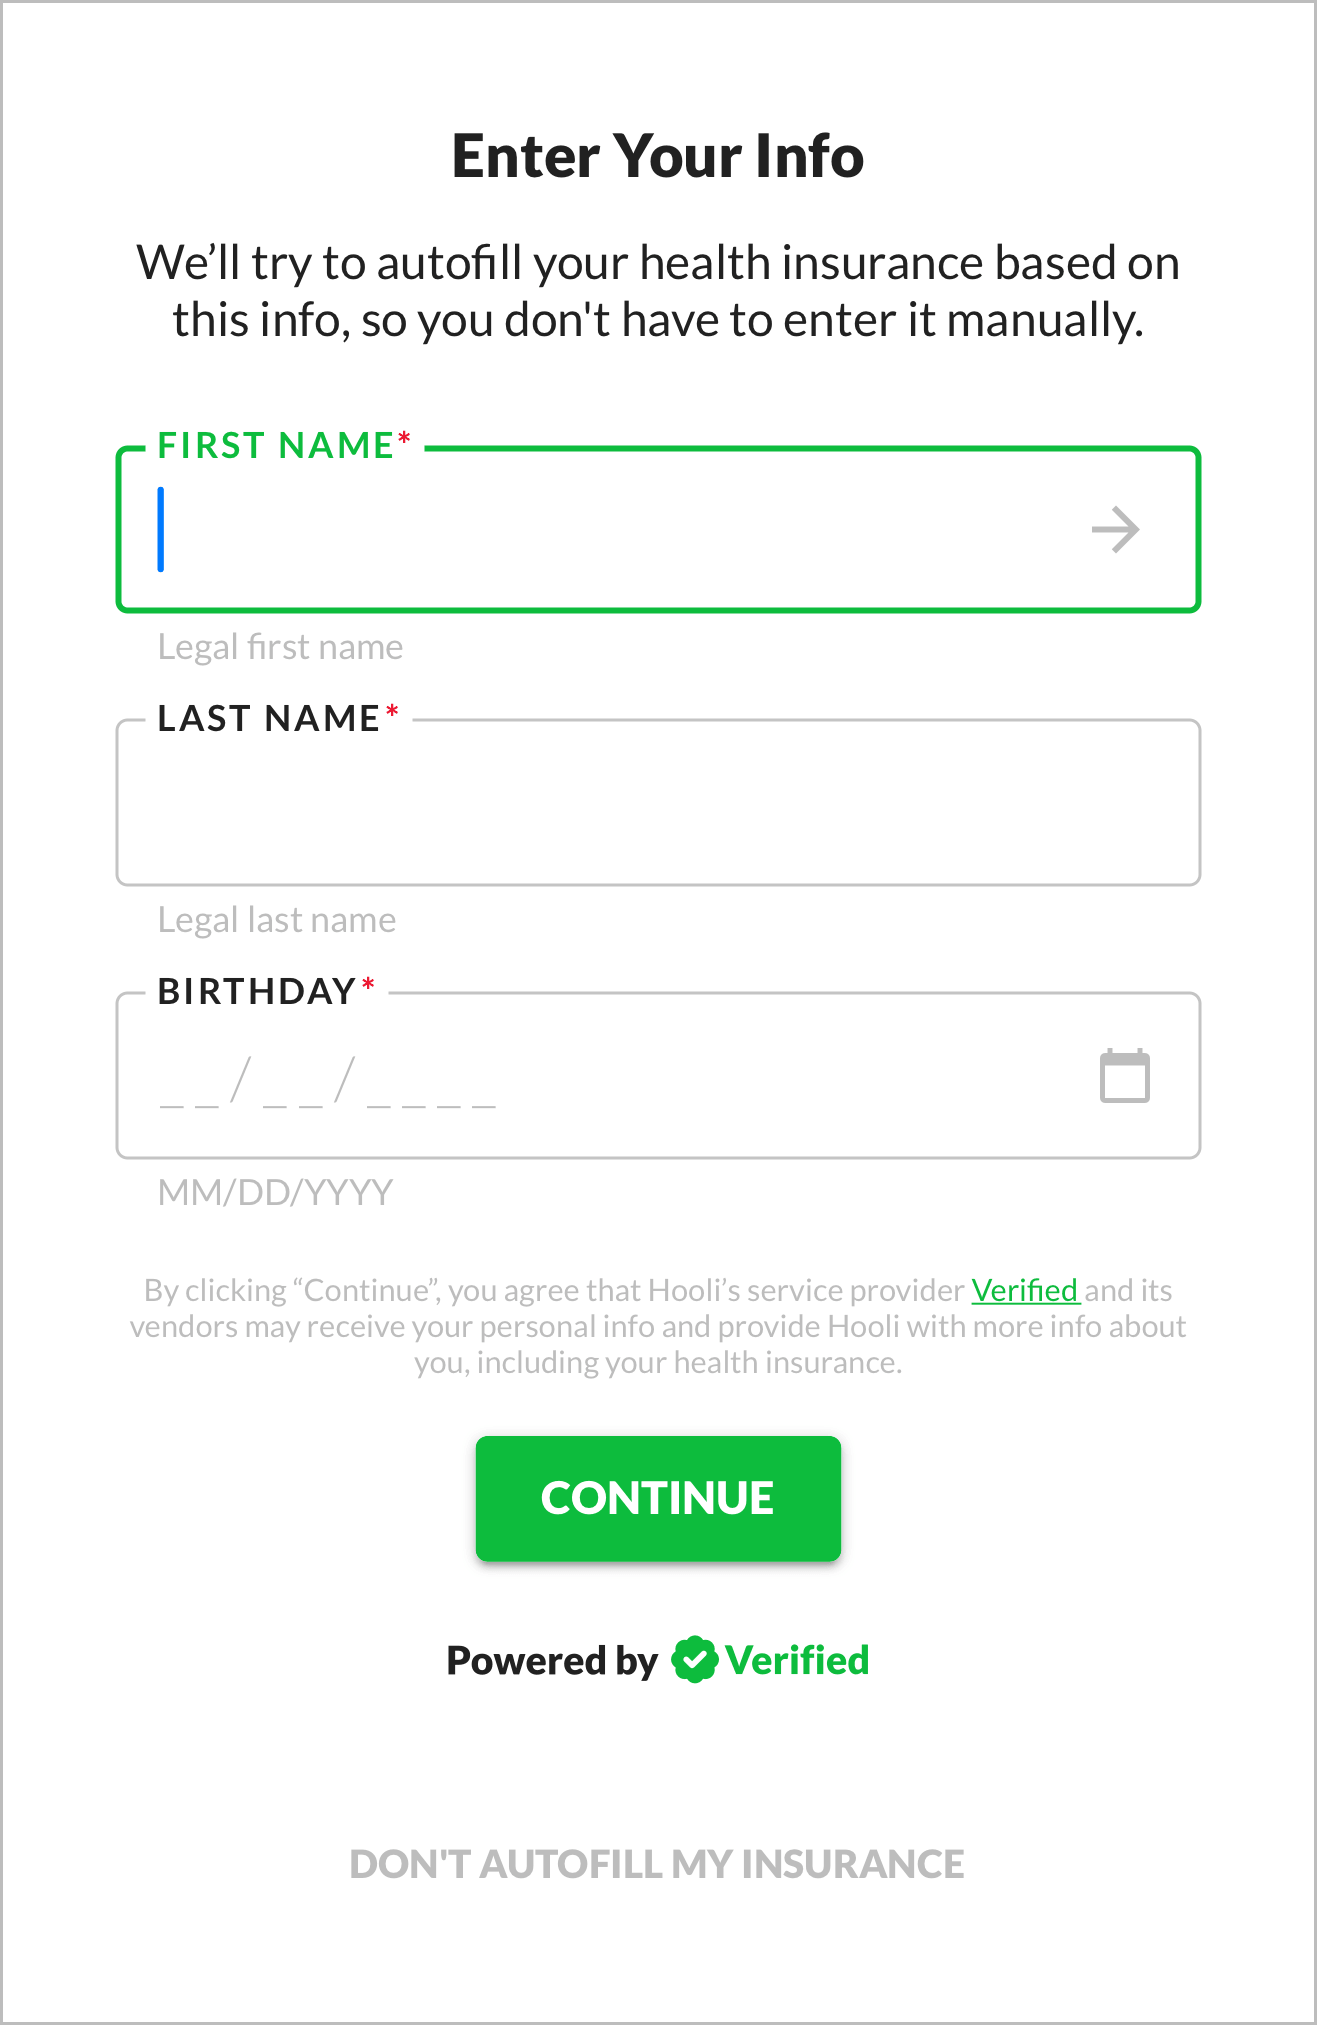
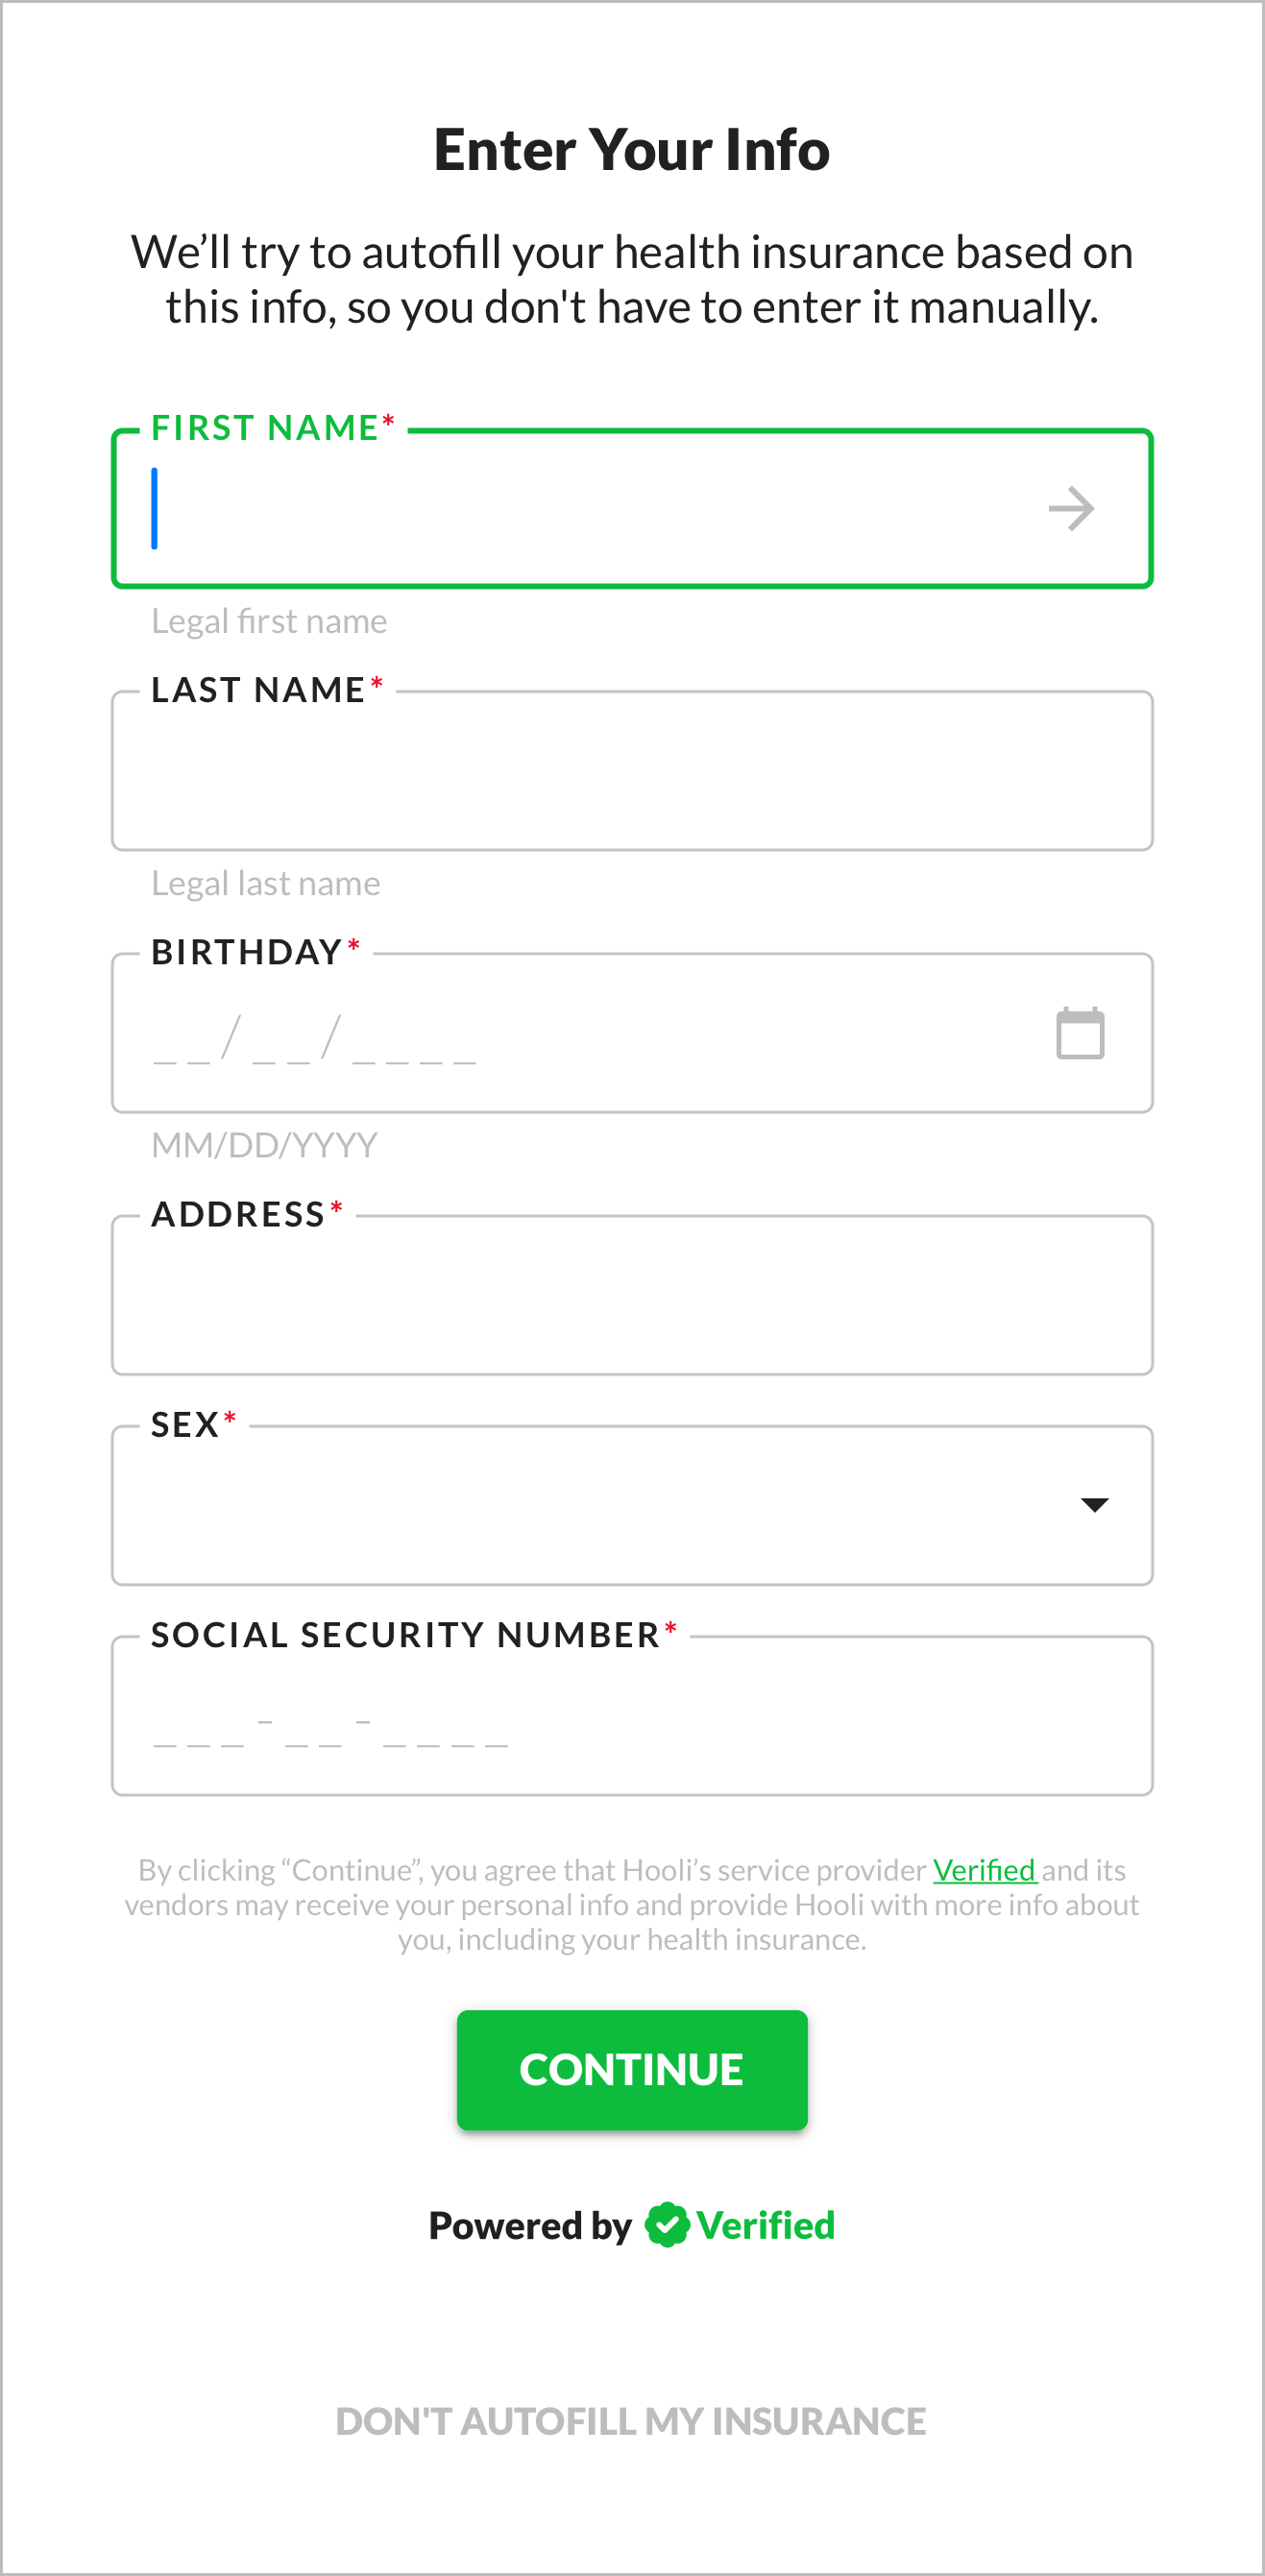
If you use 1-Click Signup to collect the inputs, you can put the consent language and graphic on a screen in that flow (for example the Phone screen): see the first example below. If you instead ask the user to manually enter the inputs, you can put them on that screen: see the second and third examples below. We recommend that you use a single screen with fields for each input you want to collect: see the Info screen of our User Experience guide for full details. Here are examples:
![]() Verified consent language (the health insurance variant) on the first screen of 1-Click Signup
Verified consent language (the health insurance variant) on the first screen of 1-Click Signup
 1-Click Signup can autofill all inputs for 1-Click Health!
 Verified consent language (the health insurance variant) on a manual entry screen, with minimal inputs
 Verified consent language (the health insurance variant) on a manual entry screen, with maximal inputs
a. Include the Verified consent language.
Regulations require that users give informed consent, so you must use our consent language before you start the 1-Click Health flow. It can be included alongside or as part of other legal language you already use, but it must be displayed to the user — not just included in terms you link out to.
You must use this 1-Click Health consent language:
By
{taking this action}, you agree that{Brand Name}’s service provider Verified and its vendors may receive your personal info and provide{Brand Name}with more info about you, including your health insurance.
- Replace
{taking this action}with the action the user will take to start 1-Click Health. For example:- If you start with 1-Click Signup, using a form with a phone number input that autosubmits (which we recommend), you should use "entering your phone number".
- If you use a Continue button, you should use "clicking ‘Continue’".
- Link "Verified" to https://verified.inc and make it underlined and a different color than the rest of the text (so the user knows it's a link).
- Replace
{Brand Name}with your brand name.
Here's an example:
By entering your phone number, you agree that Hooli’s service provider Verified and its vendors may receive your personal info and provide to Hooli more info about you, including your health insurance.
If you use 1-Click Signup to autofill SSNs as an input for 1-Click Health, you need to have "including my social security number" in the consent language, as described here in the 1-Click Signup API Integration guide. In this case, the consent language should be:
By
{taking this action}, you agree that{Brand Name}’s service provider Verified and its vendors may receive your personal info and provide{Brand Name}with more info about you, including your social security number and health insurance.
So, for example:
By entering your phone number, you agree that Hooli’s service provider Verified and its vendors may receive your personal info and provide to Hooli more info about you, including your social security number and health insurance.
b. Include a "Powered by Verified" graphic.
We require you to include a "Powered by Verified" graphic, which helps ensure the user gives legally valid consent for us to source data for them.
The graphic should be placed alongside the consent language.
We provide many different variants of the graphic, so you can choose the one that best fits your use case and the background color of your application:
"Powered By Verified" Graphic Variants
Powered by Verified
Black and Green:

White and Green:

Black:

White:

Gray:

1-Click Signup powered by Verified
Black and Green:

White and Green:

Black:

White:

Gray:

1-Click Health powered by Verified
Black and Green:

White and Green:

Black:

White:

Gray:

1-Click Login powered by Verified
Black and Green:

White and Green:

Black:

White:

Gray:

1-Click Verify powered by Verified
Black and Green:

White and Green:

Black:

White:

Gray:

1-Click Apply powered by Verified
Black and Green:

White and Green:

Black:

White:

Gray:

1-Click Access powered by Verified
Black and Green:

White and Green:

Black:

White:

Gray:

1-Click AutoFill powered by Verified
Black and Green:

White and Green:

Black:

White:

Gray:

2. Call POST /1-click/health.
Call POST /1-click/health with different inputs depending on the capability you want to leverage:
- Insurance Autofill: Include user PII (and optionally payer).
- Eligibility Check: Include user PII, payer, and member ID.
You can automatically combine these by setting Check After Autofill to On in the Dashboard or by setting checkAfterAutofill to true in the request body.
Never use Verified API keys client side. Only use them server side. Verified API keys allow you to source sensitive data about users, so you must keep them secure. If you use a Verified API key client side, our firewall will block your request, and you'll get this firewall error.
1-Click Health is asynchronous, because it can take awhile to search for a user's health insurance plans across the large number of possible payers. Response times can be as short as 3 seconds or as long as 30+ seconds. You don't receive data in the response body of POST /1-click/health but rather via webhook or by polling GET /1-click/health. See step 3 for details.
This is in contrast to 1-Click Signup, which is synchronous and almost always has response times under 1 second. You receive data directly in the response body of POST /1-click, though you can also receive it via webhook or by polling GET /1-click.
Insurance Autofill
To autofill insurance, call POST /1-click/health with PII (and optionally payer):
Without Payer
With Payer
The response body will contain a healthDataUuid that identifies the 1-Click Health flow:
{
    healthDataUuid: string,
    status: "PENDING" | "PROCESSING" | "SUCCEEDED" | "FAILED" | "PARTIAL"
}
See POST /1-click/health for details.
Eligibility Check
To run an eligibility check, call POST /1-click/health with PII, payer, and member ID:
- From 1-Click Signup
- From Manual Signup
If you used 1-Click Signup to autofill inputs, you should include identityUuid as an input with the value of uuid from the response body of POST /1-click (which you call for 1-Click Signup):
{
    "identityUuid": "f90b96d9-9d64-4675-8855-9ee1e188a38a", // from 1-Click Signup response body
    // No other PII inputs implies user didn't edit 1-Click Signup data
    "payer": {
        "id": "V404110"
        // "name": "Verified Medicare" // Only use if payer ID is not known
    },
    "memberId": "A484069"
}
If the user didn't edit any of the data autofilled by 1-Click Signup, you can include the identityUuid, and 1-Click Health will hydrate all of the relevant 1-Click Signup outputs as inputs.
If the user edited some of the data autofilled by 1-Click Signup, you should include the edited fields alongside the identityUuid, and 1-Click Health will hydrate the rest of the 1-Click Signup outputs as inputs:
{
    "identityUuid": "f90b96d9-9d64-4675-8855-9ee1e188a38a", // from 1-Click Signup response body
    // Other inputs included are for 1-Click Signup data that user edited
    "address": { // Full address must be included for clarity, even if only one part was edited
        "line1": "5320 Newell Rd",
        "line2": "#1", // from user edit
        "city": "Palo Alto",
        "state": "CA",
        "zipCode": "94303",
        "country": "US"
    },
    // All other PII inputs can optionally be included for clarity
    "payer": {
        "id": "V404110"
        // "name": "Verified Medicare" // Only use if payer ID is not known
    },
    "memberId": "A484069"
}
If the user manually entered inputs, you should include them directly in the request body:
{
    "fullName": {
        "firstName": "Richard",
        "lastName": "Hendricks"
    },
    "birthDate": "1989-08-01",
    "payer": {
        "id": "V404110"
        // "name": "Verified Medicare" // Only use if payer ID is not known
    },
    "memberId": "A484069"
}
You must include at least first name, last name, and birth date as inputs, but we strongly recommend also including at least state or ZIP code if possible. In general, the more inputs you provide, the higher coverage and accuracy will be. Because 1-Click Health is billed per attempt (not just per success), it's well worth collecting more inputs upfront.
{
    "fullName": {
        "firstName": "Richard",
        "lastName": "Hendricks"
    },
    "birthDate": "1989-08-01",
    "address": {
        "line1": "5320 Newell Rd",
        "line2": "#1",
        "city": "Palo Alto",
        "state": "CA",
        "zipCode": "94303",
        "country": "US"
    },
    "sex": "Male",
    "ssn": "000456789",
    "payer": {
        "id": "V404110"
        // "name": "Verified Medicare" // Only use if payer ID is not known
    },
    "memberId": "A484069"
}
One of the reasons we strongly recommend using 1-Click Signup to autofill inputs for 1-Click Health is that we can then hydrate inputs that are never exposed to you or the user, improving the success rate of 1-Click Health! The most important example concerns Social Security Numbers (SSNs):
Most healthcare companies don't collect SSNs and therefore don't want to ask users to provide or confirm them. However, using SSNs as inputs for 1-Click Health can significantly improve success rates (especially for Medicare) — because SSNs are de facto unique, static identifiers for most US adults.
If you use 1-Click Signup to autofill inputs for 1-Click Health, we can hydrate SSNs — never exposing them to you or the user — and then use them to source health insurance data. There are various restrictions on how and when we do this. (For example, we'll only use a hydrated SSN if a user doesn't significantly edit the rest of the autofilled 1-Click Signup data.) But this allows you to improve the success rate of 1-Click Health while never needing to ask for or process SSNs yourselves.
This is a huge advantage of using 1-Click Signup and 1-Click Health in combination.
For object type inputs (Full Name and Address), you must include all "standard" fields, or you'll get an error:
- Full Name: You must include First Name and Last Name (but not Middle Name), even if the user only edited, for example, First Name. This is for clarity.
- Address: You must include Line 1, City, State, Zip Code, and Country (but not Line 2), even if the user edited, for example, Line 1. This is for clarity and to ensure that an invalid address isn't formed by implicitly combining edited and unedited pieces.
The response body will contain a healthDataUuid that identifies the 1-Click Health flow:
{
    healthDataUuid: string,
    status: "PENDING" | "PROCESSING" | "SUCCEEDED" | "FAILED" | "PARTIAL"
}
See POST /1-click/health for details.
3. Receive outputs.
If you configured the webhook setting in the Verified Dashboard, we'll send the 1-Click Health response as a payload to your webhook.
See the Webhooks page for general details about how Verified handles webhooks.
You can alternatively poll the GET /1-click/health endpoint until you receive a response. To do so, repeatedly call GET /1-click/health/{healthDataUuid}, using the value of healthDataUuid from the response body of POST /1-click/health.
You can retrieve data for 60 minutes, at which point it's deleted. If you need to retrieve the same data again, use GET /1-click/health instead of POST /1-click/health so that a duplicate 1-Click Health event isn't created (and so you aren't billed twice).
The response will contain a 1ClickHealthEntity (see this example). There are two cases:
- Success: If we can source health insurance data for the user, the
1ClickHealthEntitywill containresultswith one or more health insurance plans.
→ Continue to step 4. - Failure: Otherwise, the
1ClickHealthEntitywill containerrorsindicating that the lookup failed.
→ Fall back to a manual health insurance entry flow.
If we return multiple health insurance plans for a user, they're ordered from most to least probable. All plans we return have a high probability of matching the user, since we filter out low probability ones.
A user may have multiple plans, for example if they have separate ones for medical, dental, or vision. We recommend that you let the user choose which plan they want to use, setting the first plan we return (which we deem most probable) as the default choice.
1-Click Health can return many different IDs for a given payer:
verifiedId: This ID identifies the payer within Verified but is not used in external systems. It never changes, so it can reliably used to identify the payer over time.ids[]: These IDs identify the payer in external systems, like healthcare clearing houses or the payer's own system. They may change over time.ids[0]: This is considered the primary ID for the payer and is generally the ID the payer uses for itself. It may change over time.
4. (optional) Prompt user to confirm.
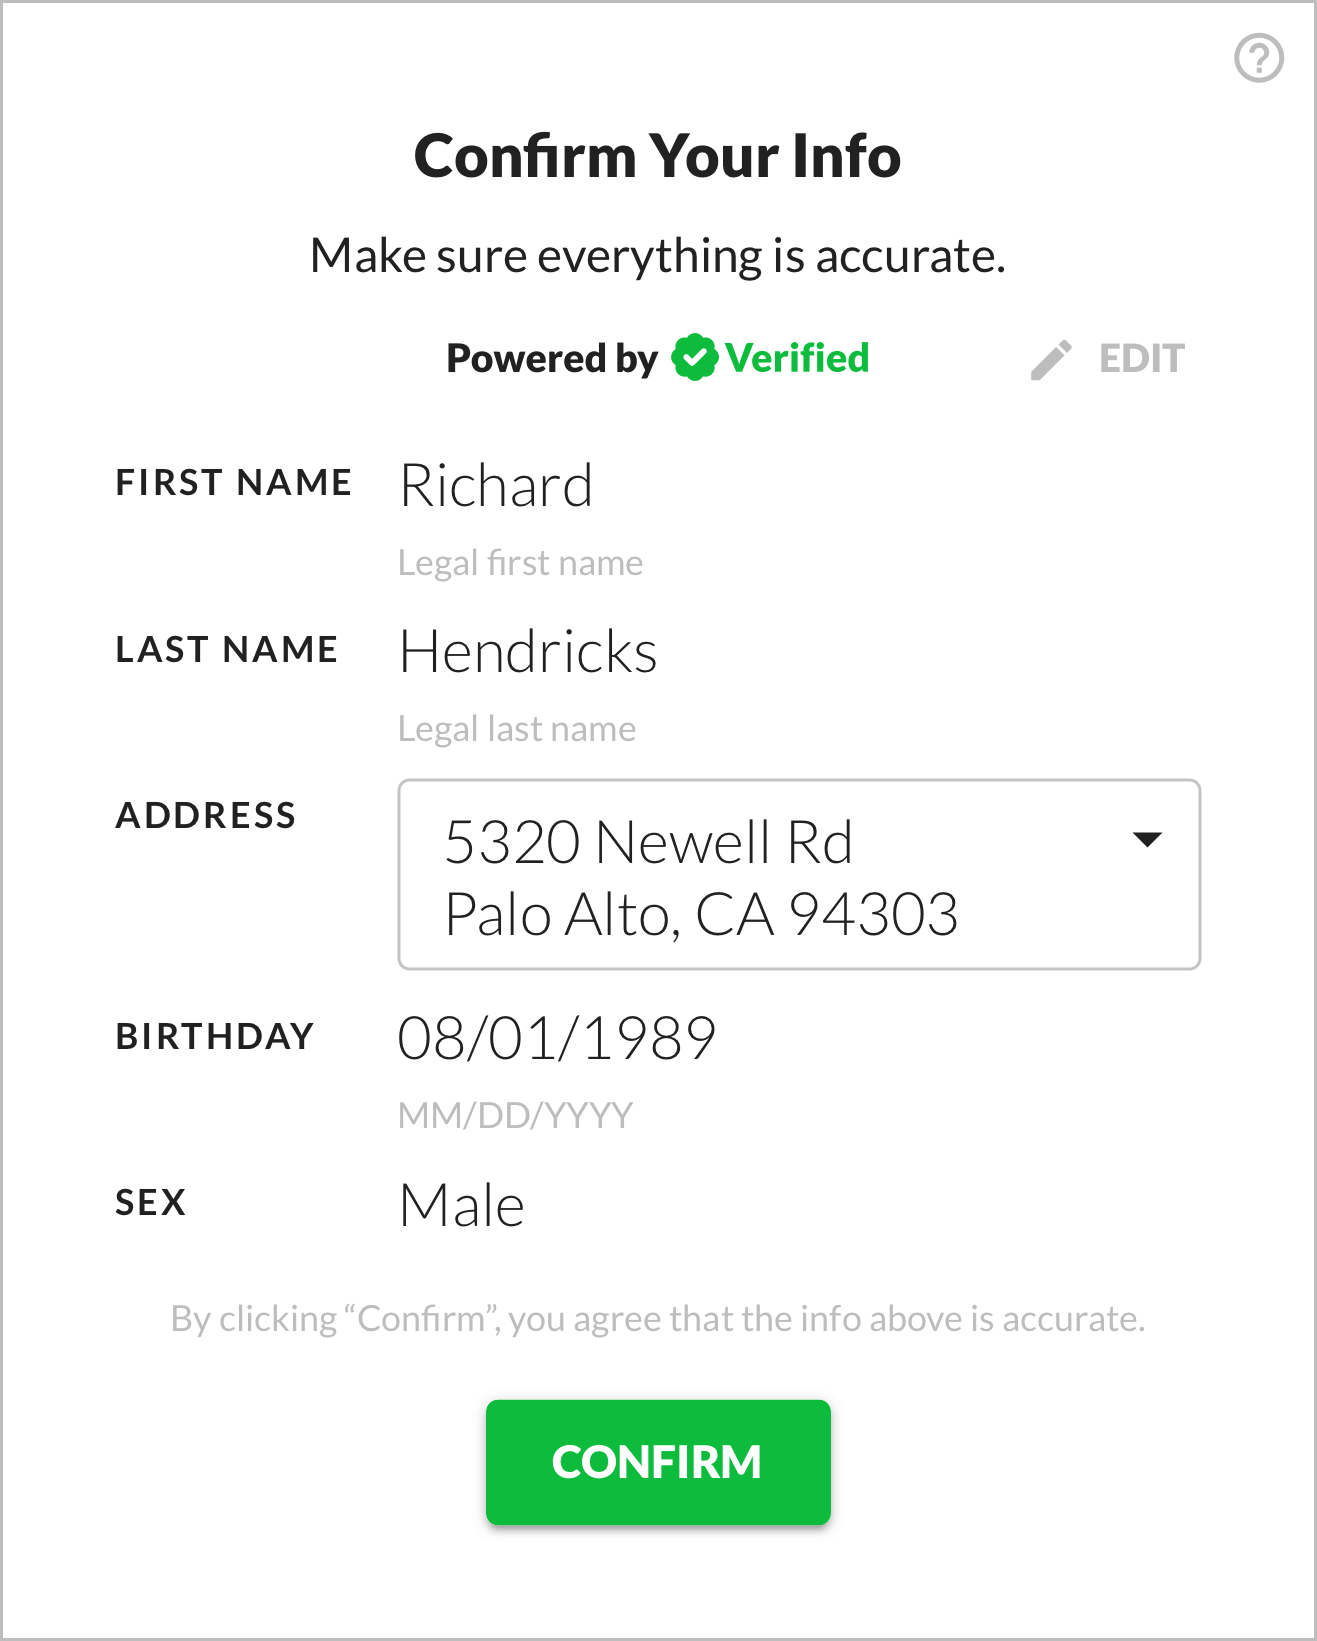
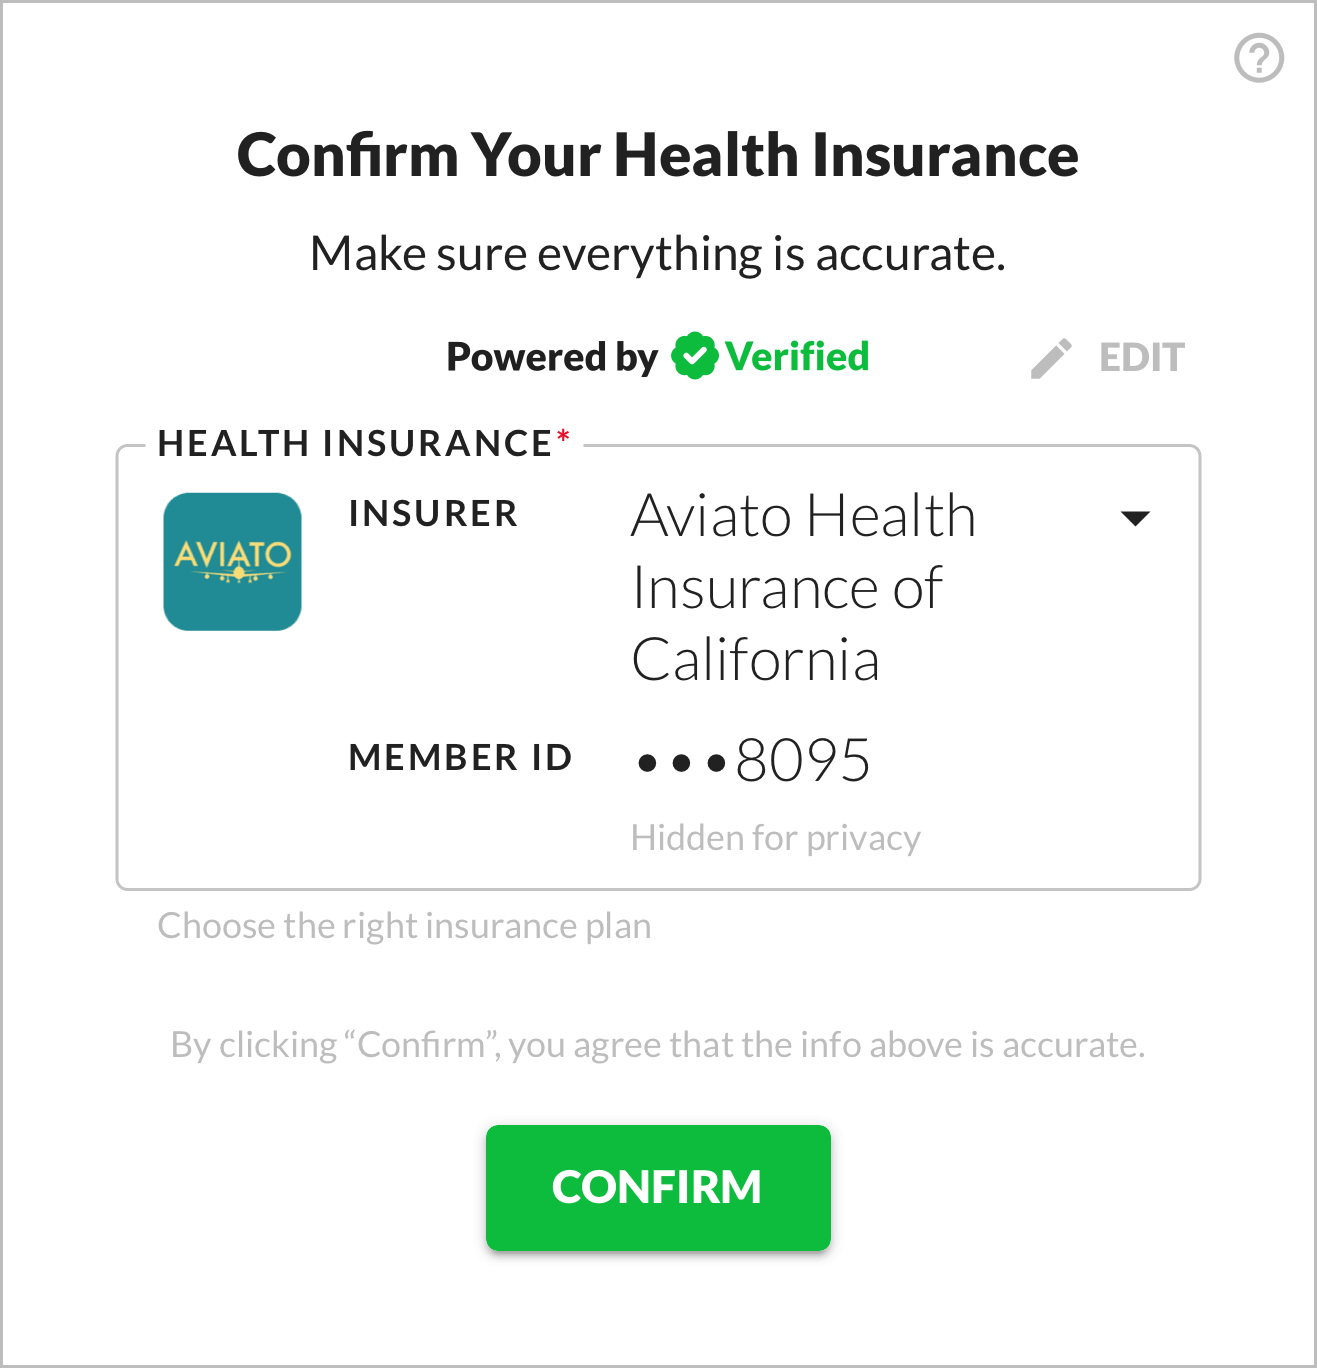
For each health insurance plan you might use for a user, you should consider displaying the Payer Name and Member ID for the user to confirm. These are contained in memberId and payer.name, respectively, for a given plan within the results array of the 1ClickHealthEntity.
You don't need to display the full X12 EDI 271 (Health Care Eligibility Benefit Response, contained in edi_271) — and you shouldn't, because it's not human readable!
- Transparency: By displaying the user's data to them, you ensure they're aware of what data you've received about them.
- Accuracy: Although Verified provides very high quality data, we can never guarantee all data will be perfectly accurate. By having the user confirm their data, you can better avoid inaccuracies. Depending on your use case, you may want to give the user the ability to edit their data.
Whether or not you prompt the user to confirm their insurance info, you must further verify the user's identity before using that insurance info for billing. For example, you can prompt the user to verify a government ID, to ensure that the inputs you used to source their insurance info match that ID.
This is crucial to prevent insurance fraud, since insurance info can be autofilled from as little as First Name, Last Name, and Birth Date inputs — which a bad actor can find easily.
We strongly recommend using 1-Click Signup to source inputs for 1-Click Health because, among other benefits, it deters fraud. However, even with 1-Click Signup, further identity verification is essential to ensure any insurance info you use for billing is accurate and associated with the correct user.
We require you to mask Member IDs because they're particularly sensitive:
- Mask all except the last 4 characters server side, so the client only displays the last 4 characters. Note that Member IDs are alphanumeric and variable in length. We recommend using the • character to mask, so that (for example) B231615071 is masked as ••••••5071.
- If you allow the user to edit the Member ID, clear the entire value when they start editing (by deleting one character), so they don't just edit visible characters (which could result in another valid Member ID, but one that isn't theirs).
We recommend that you:
- Use a static display for view mode.
- Use a form with autofilled inputs for edit mode.
- Include information about where the data comes from.
(See the Info screen of our User Experience guide for full details.) Here's an example:
 Static display for view mode (multiple plans)
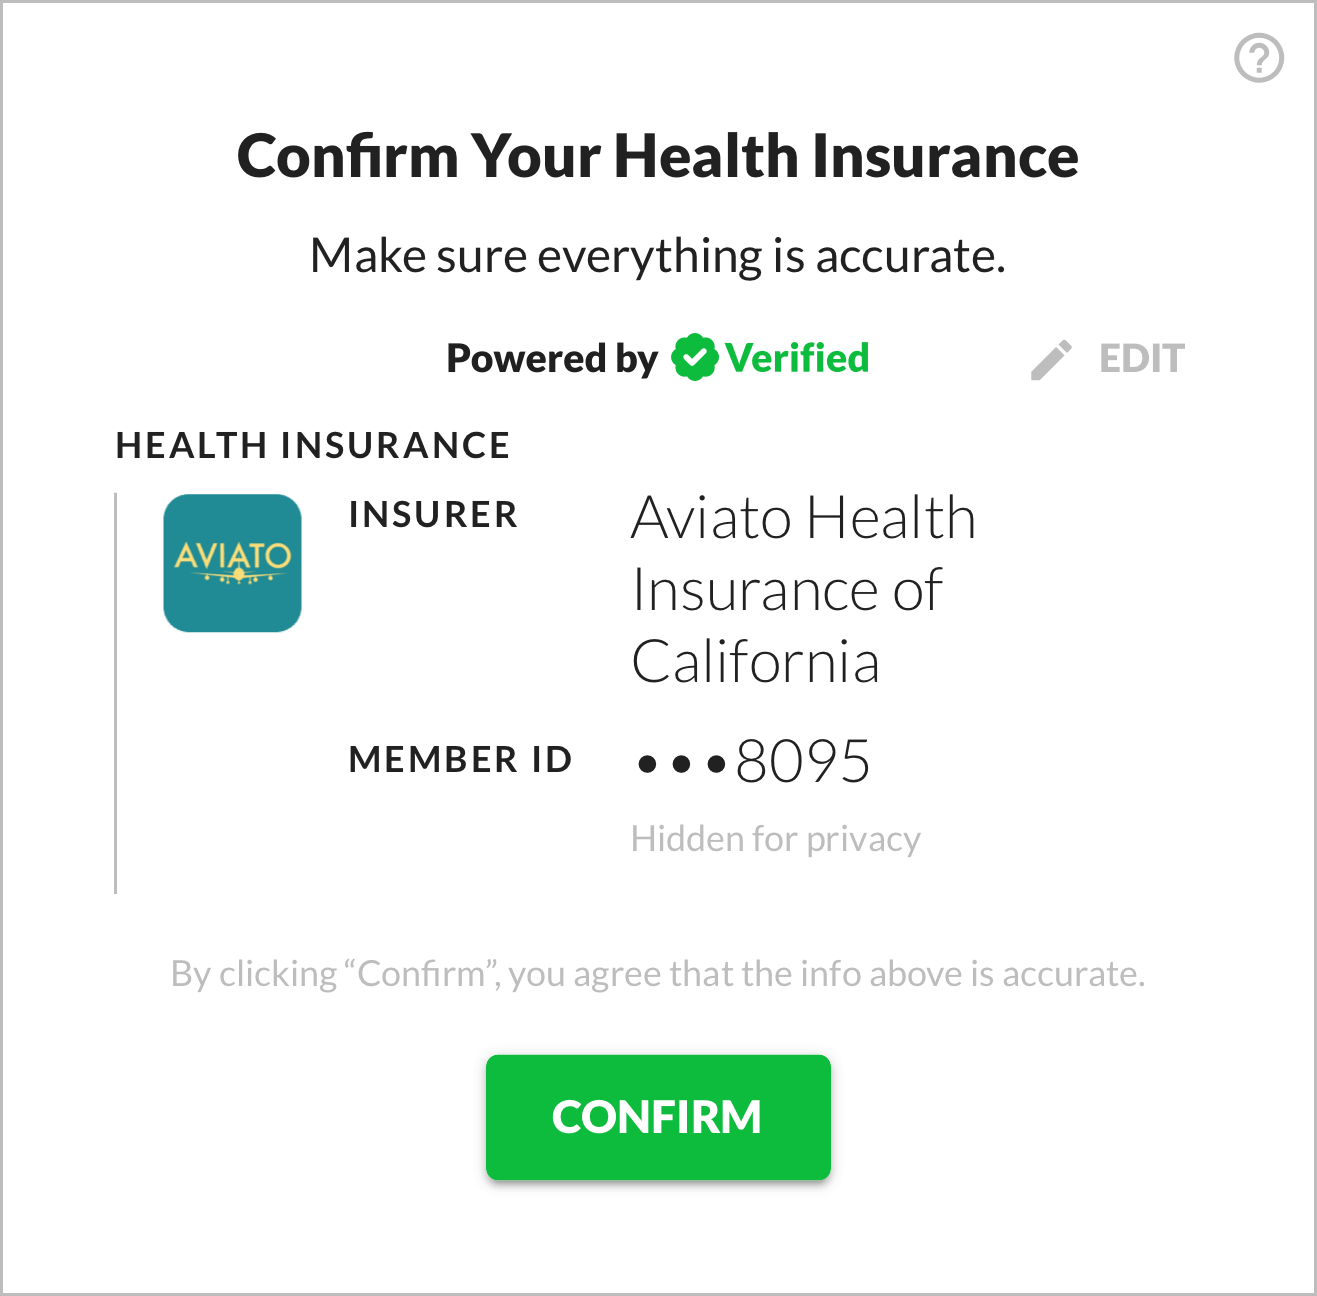 Static display for view mode (single plan)
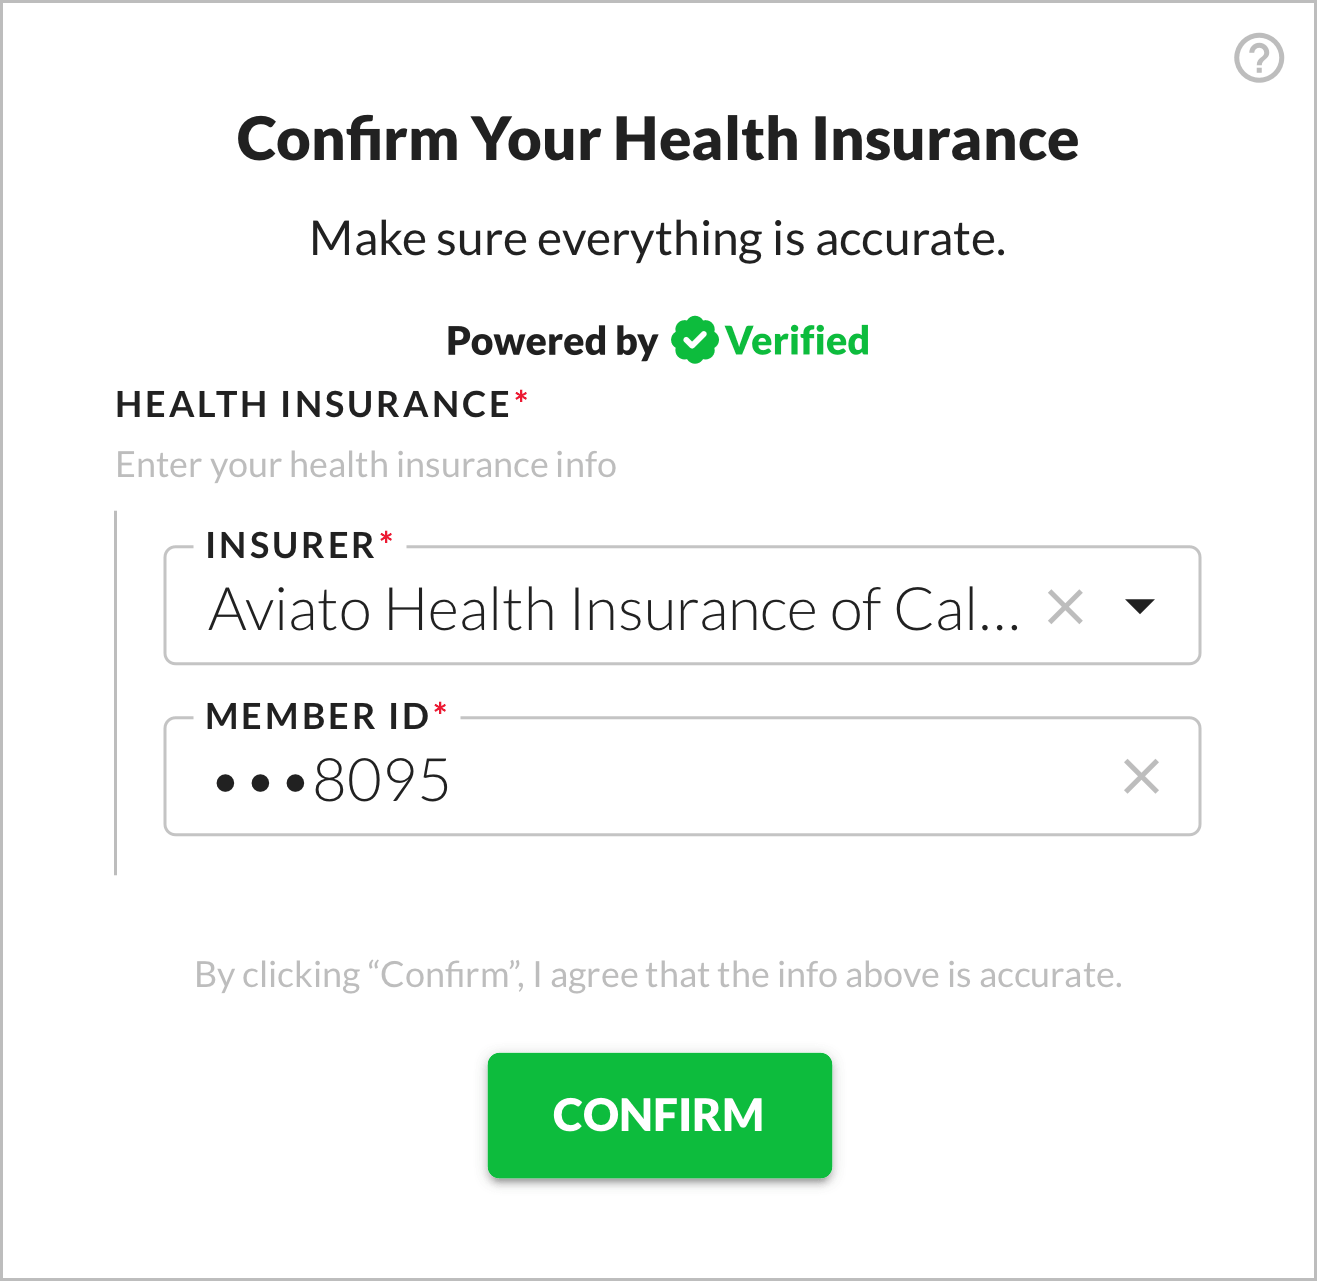 Form with autofilled inputs for edit mode, question mark button to see information about where data comes from
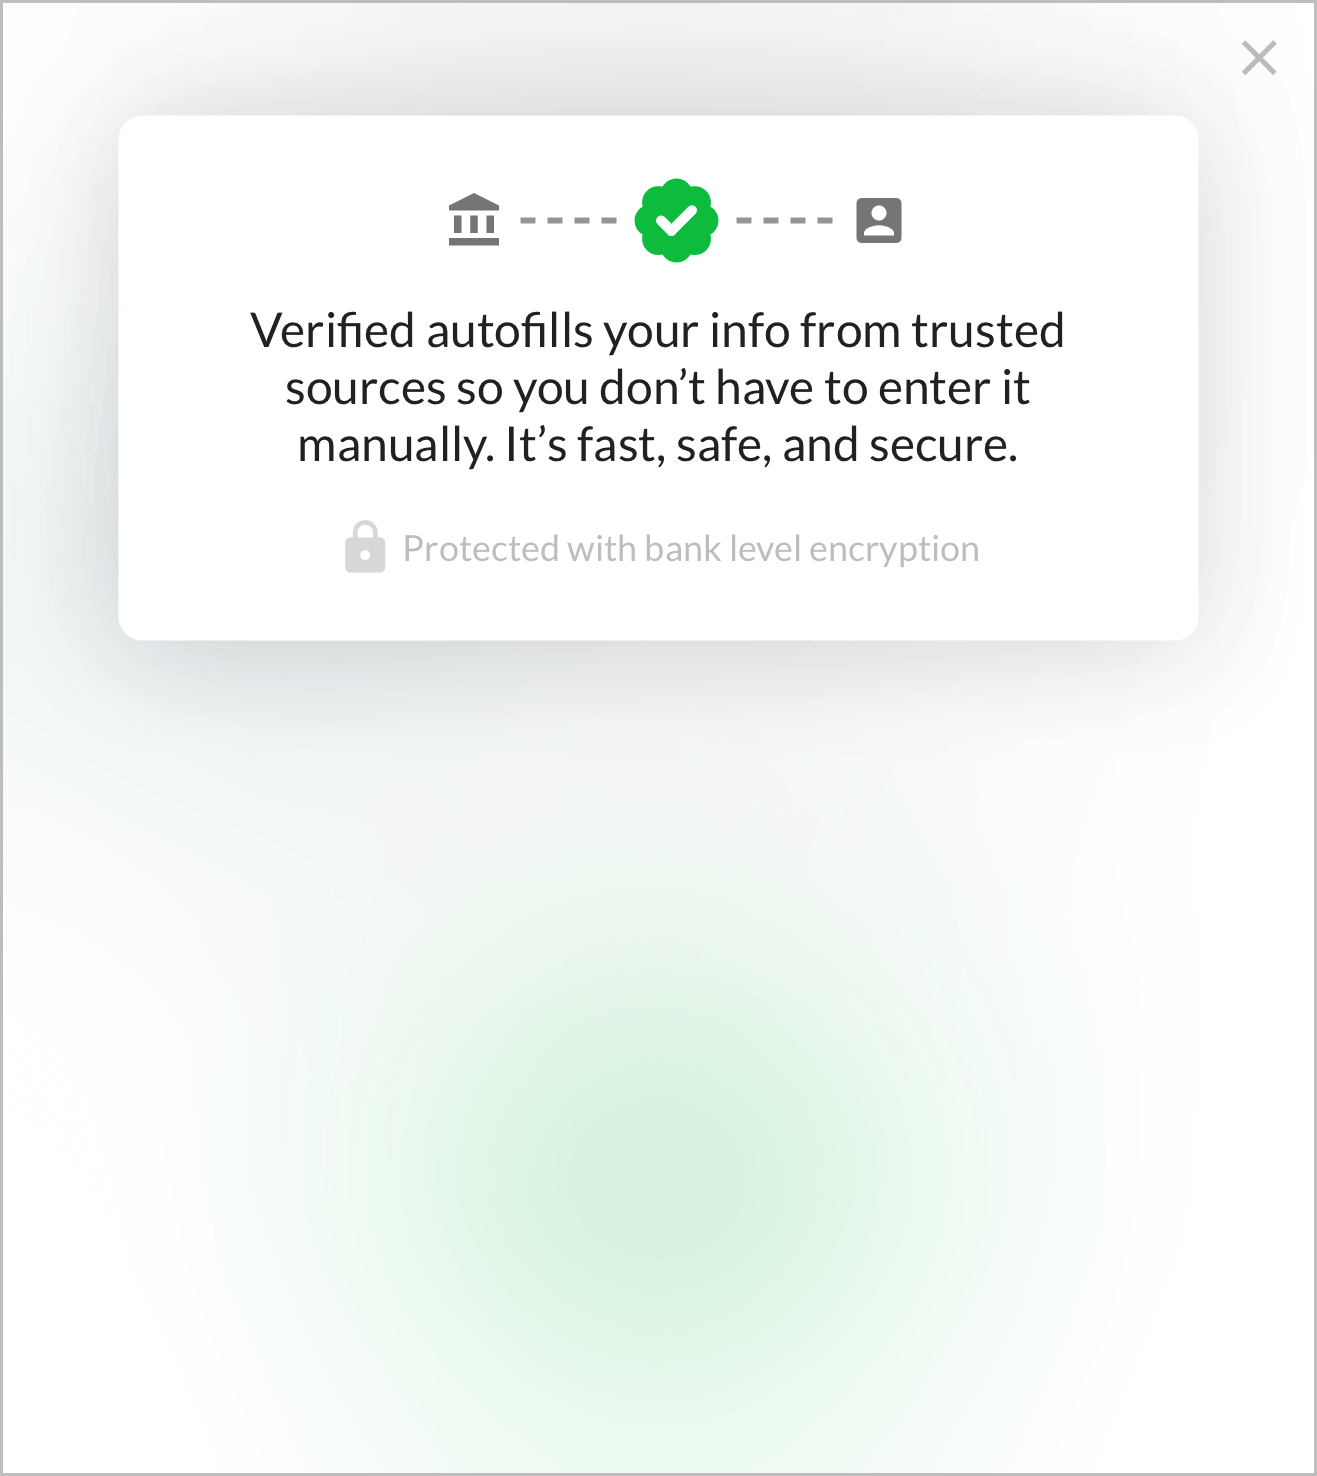 Information about where data comes from
a. Use a static display for view mode.
In edit mode, we recommend that you display the user's data statically and show an edit button that lets them go into edit mode.
If you receive multiple health insurance plans (in the results array of the 1ClickHealthEntity), you can display a dropdown of options. If the user goes into edit mode, you should use the selected value in the dropdown to autofill inputs.
b. Use a form with autofilled inputs for edit mode.
In edit mode, we recommend that you display the user's data using a form with autofilled inputs.
You can enable or disable each input depending on whether you want the user to be able to edit the data it contains. The upside of allowing the user to edit data is that it allows them to correct any inaccuracies. The downside is that user input isn't verified and may make fraud more likely.
c. Include information about where the data comes from.
Including some information about where the data comes from helps users understand the magic of 1-Click Health and feel comfortable with it. We recommend this language:
Verified autofills your info from trusted sources so you don’t have to enter it manually. It’s fast, safe, and secure.
We cannot guarantee that autofilled health insurance data is accurate, especially if you sourced it using inputs not autofilled by 1-Click Signup. It's possible that the insurance a user submits is inaccurate.
So, you must verify a user's identity in some other way before using their insurance. This is an important step to prevent insurance inaccuracy or fraud – and to make sure you're paid by insurance!
Go Live!
Request Approval
When you're ready to go live, request approval for Production access:
- Go to the Brand Details page for your brand in the Verified Dashboard.
- Click the Production tab in the upper right, and make sure your brand settings are configured as you intend them to be.
- Click the Request Approval button under the API Keys section.
- Complete the steps listed in the dialog.
- Click the Submit Request button.
You can use the Sync from Sandbox buttons to quickly port some setting configurations from Sandbox to Production. Note, however, that this is not possible for all settings: some need to be configured manually for Production.
In step 4, you'll be asked to confirm the following:
You'll also be prompted to share a link to your Sandbox integration and/or schedule a 15 minute call with us, so we can review your integration to see that it's compliant and working properly. Once we approve it, you'll have access to a Production API key on the Brand Details page.
Swap Sandbox for Production
Once you have Production access, just swap Sandbox for Production:
- Swap your Sandbox API key for your Production API key.
- Swap the Sandbox base URL for the Production base URL.
Then you'll be live with 1-Click Health! ✅